The dipswitch settings must match for the Transmitter and Receiver to communicate properly. The default setting is with all dipswitches set to the OFF position.
- The Transmitter dipswitches are pushed toward the battery contact springs.
- The Receiver dipswitches are pushed away from the gold contacts.
Transmitter
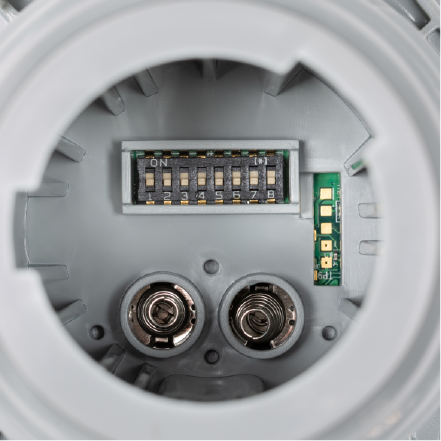
- Postion the Transmitter so that the gold contacts are on the right hand side.
- Set the dipswitches by setting them to either the ON or OFF position.
Note: The dipswitches are ON when pushed away from the numbers.
Receiver
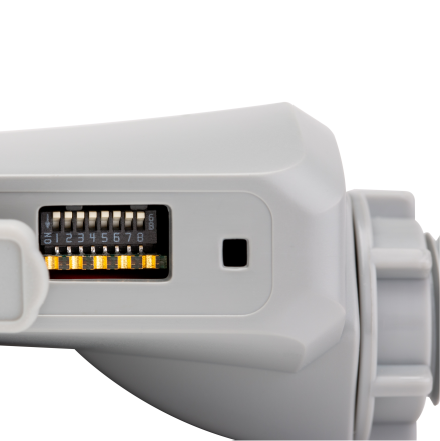
- Position the Transmitter so that the gold contacts are facing you.
- Set the dipswitches by setting them to either the ON or OFF position.
Note: The dipswitches are ON when pushed TOWARD THE NUMBERS
Troubleshooting
- Remove the Sensor from the Flow Clik Tee (FCT)
- Be sure to turn the water off prior to removing the Sensor.
- Spin the Sensor paddlewheel and observe the LED.
- The LED should blink approximately every 6 seconds when spinning. If not, check the batteries charge and polarity
- Install the Receiver with the controller powered off while observing the polarity
- Apply power to the controller while watching the LED on top of the Receiver
- The LED should blink once within 10 seconds. If no blinking, check the connection and polarity at the controller.
- Spin the paddlewheel on the Sensor
- The LED on the Receiver should blink approximately every 6 seconds when the paddlewheel is spinning.
Electrical or RF noise interference, or other WFS’s in the area can prevent reliable field reception. Changing the dipswitch settings on both receiver and transmitter to improve reception. Ensure both receiver and transmitter have identical settings and retest up close first to ensure correct pairing.
Still need help? We're here.
Tell us what you need support with and we'll find the best solution for you.