
Welcome! If you need help setting up your Hunter slat wall display, you have come to the right spot. Here, you will find detailed instructions and videos about how to set up your display, which displays to use for which products, graphics for your displays, and more. Questions? Email MarketingServices@hunterindustries.com.
LITERATURE AND SIGNAGE
The Hunter slat wall displays come with a variety of options for literature holders and signage. The flyer, poster, and brochure displays are shelf and slat wall display compatible. Use the easel on the back of the display to prop up on a counter or shelf.
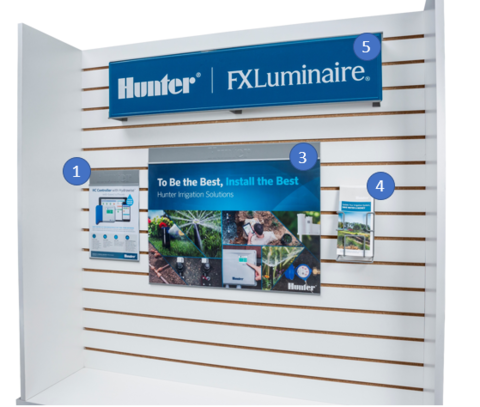
- 8.5 x 11 flyer sign
- A4 flyer sign (for International markets) (not in image)
- 24 x 17 poster holder
- Tri-fold brochure holder (4.375" x 8.25")
- Metal branded sign (36" x 8")
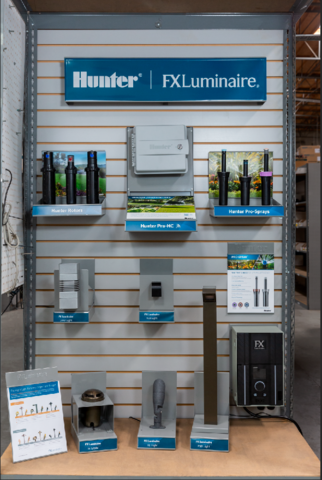
OVERVIEW OF LITERATURE AND SIGNAGE DISPLAYS
Product Displays
There are four product display options you can choose from. The general product display comes with a rotor, valve, and spray plates. All the displays are shelf and slat wall display compatible.

- Rotor display
- Valve display
- Controller display
- Spray display
OVERVIEW OF PRODUCT DISPLAYS
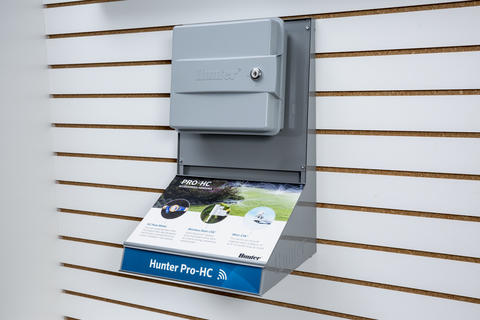
CONTROLLER DISPLAY
The Hunter Controller display is intended for use on a Slatwall or countertop.
WHAT TO KNOW BEFORE YOU ORDER
- When ordering the controller displays, you must order the Hardware kit as well. All the necessary hardware is included in the kit to properly set up the display.
- The controller display fits the following controllers:
- HC
- Pro-HC
- Pro- C
- X-Core
SET-UP INSTRUCTIONS
- Once you remove the shelf and the plate from the box, ensure all the plastic film is removed from the display before you get started.
- There are will be a hole on the top of the plate. Screw in the screw that comes with the displays.
- There will be two velcro adhesive stickers. Remove the backing on side of the velcro and place it in the bottom corners of the controller. Then remove the back of the other side of the velcro before mounting the controller.
- The controller will have a notch on the back that you will use to hang it from the screw on the display. Hang the controller from the screw on the display then press so the velcro stickers can keep the display straight.
- Please note that electric cords can be threaded through the opening between the Controller Plate and the information panel on the display shelf. You can also remove the electrical cord as well as shown in the image below.
- Once you hang the shelf or place the shelf on the counter, add the product label ticket strip and the flyer graphic of your choosing!
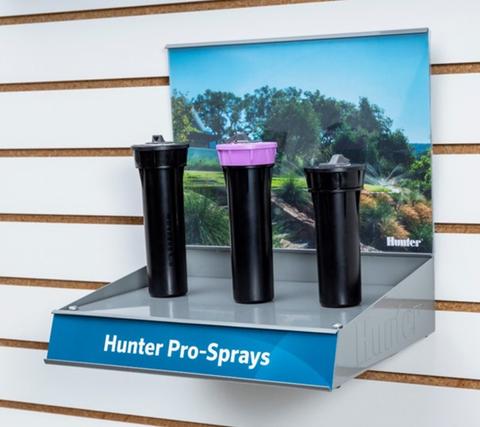
PRODUCT DISPLAYS
The Hunter Product Displays are intended for use on a slatwall or countertop.
WHAT TO KNOW BEFORE YOU ORDER
- When ordering the product displays, you must order the Hardware kit as well. All the necessary hardware is included in the kit to properly set up the display.
- The product display shelves come with three different plate for Valves, Sprays, and Rotors
- The Valve Plate display fits the following products:
- ICZ Drip Control Zone Kit
- ACZ -075 Drip Control Zone Kit
- ICV, PGV, and node fits on the valve with solenoid
- The ProSpray and Rotor plate fits the following products:
- All Pro-Spray and PS Ultra models using ½” threaded plugs (5)
- All ¾” threaded Rotors – PGP, PGP Ultra, and I-20 using ¾” bushings (2) or ¾” x ½” reducing bushing (1)
- I-40 using 1” bushing (1)

SET-UP INSTRUCTIONS FOR VALVE PLATE
- Once you remove the shelf and the plate from the box, ensure all the plastic film is removed from the display before you get started.
- There are various hole patterns in the center of the plate depending on which product you chose. With the valve plate, you’ll attach the valve onto the plate with zip ties.
- After the product has been securely fastened to the plate, attach the plate to the display shelf. There are four holes in the corners of the plate. Align the holes on the plate with the shelf and screw in the screws.
- Once you hang the shelf or place the shelf on the counter, add the product label ticket strip and the flyer graphic of your choosing!
[
SET-UP INSTRUCTIONS FOR SPRAYS AND ROTORS
- Once you remove the shelf and the plate from the box, ensure all the plastic film is removed from the display before you get started.
- There are various hole patterns in the center of the plate depending on which product you chose. Line up the bottom of the product with the hole and screw the product to the plate with the male threaded plug.
- After the products have been securely fastened to the plate, attach the plate to the display shelf. There are four holes in the corners of the plate. Align the holes on the plate with the shelf and screw in the screws.
- Once you hang the shelf or place the shelf on the counter, add the product label ticket strip and the flyer graphic of your choosing!
Planogram Examples


Important Information for Hunter Sales Managers
Please review all the instructions before placing your orders to ensure that you have all the materials necessary to properly set up your display.
ORDERING INFORMATION
- To order a Hunter Slat Wal display, please visit the Hunter Product Display store.
- To order Hunter Slat Wall display flyers, posters, and ticket strips, please visit the Literature Marketplace.
- To order products for the displays, please reach out to your customer service representative.
- Questions? Email MarketingServices@hunterindustries.com.
TIPS FOR ORDERING AND SET-UP
- Visit the branch and review the space where is displays are going. Be sure that you have enough room for everything that you are ordering.
- Once you have ordered all the materials and have had the display sent to the branch, we recommend blocking off a day to set up the display at the branch. Depending on how many shelves and signs you order, setting up the displays is time-consuming.
- Bring your tool bag. The displays will require a screwdriver and a Hex Key Allen Wrench for set-up. The shelves will come with a little tool kit that contains the screws and a Hex Key Allen Wrench the display needs. We recommend you bring your own tools for a quicker, easier setup.
GET STARTED!
- Place your order for the Slat Wall Display shelves, signs, flyer & poster holders, for the branch through the Product Display Store
- For Controller display or Product displays, please be sure you order a hardware kit too. This will have materials required during setup.
- Don't forget your graphics! Order the graphics for the display from the Literature Marketplace.
- Get products for your displays by ordering from your Customer Service rep.